At this point, it's necessary to let the installation program know where it should install Red Hat Linux. This is done by defining mount points for one or more disk partitions in which Red Hat Linux will be installed. You may also need to create and/or delete partitions at this time.
The installation program then presents a dialog box that allows you to choose from two disk partitioning tools (see Figure 16). The two choices you have are:
[SPARC Systems: Disk Druid is not available on Red Hat Linux/SPARC.]
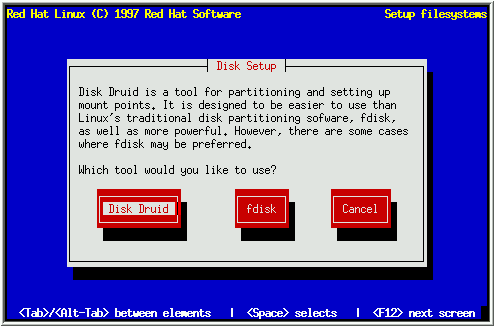
With the exception of certain esoteric situations, Disk Druid can handle the partitioning requirements for a typical Red Hat Linux installation.
Select the disk partitioning tool you'd like to use, and press [Enter]. If you choose Disk Druid, continue reading. If you'd rather use fdisk, please turn to Section 4.3.2.
If you selected Disk Druid, you will be presented with a screen that looks like figure 17. While it may look overwhelming at first, it really isn't. Let's go over each of Disk Druid's three sections, and you'll see that there's nothing to be scared of.
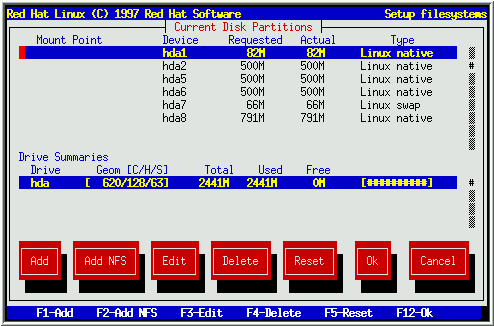
Each line in the ``Current Disk Partitions'' section represents a disk partition. You'll note that this section has a scroll bar to the right, which means that there might be more partitions than can be displayed at one time. If you use the [\uparrow] and [\downarrow] keys, you can see if there are any additional partitions there. Each line in this section has five different fields:
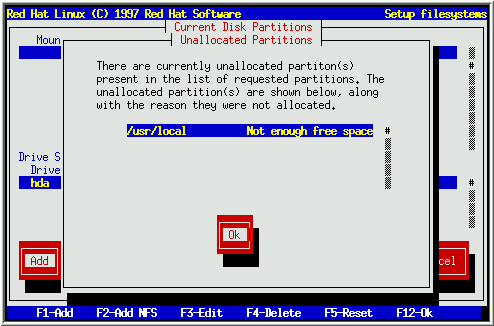
As you scroll through the ``Current Disk Partitions'' section, you might see an ``Unallocated Requested Partitions'' title bar, followed by one or more partitions. As the title implies, these are partitions that have been requested but, for one reason or another, have not been allocated. A common reason for having an unallocated partition is a lack of sufficient free space for the partition. In any case, the reason the partition is unallocated will be displayed after the partition's mount point.
Each line in the ``Drive Summaries'' section represents a hard disk on your system. Each line has the following fields:
These buttons control Disk Druid's actions. They are used to add and delete partitions, and to change partition attributes. In addition, there are buttons that are used to accept the changes you've made, discard those changes, or exit Disk Druid entirely. Let's take a look at each button in order.
Please Note: You will need to dedicate at least one partition to Red Hat Linux, and optionally more. This is discussed more completely in Section 2.4.4.
Now let's see how Disk Druid is used to set up partitions for your Red Hat Linux system.
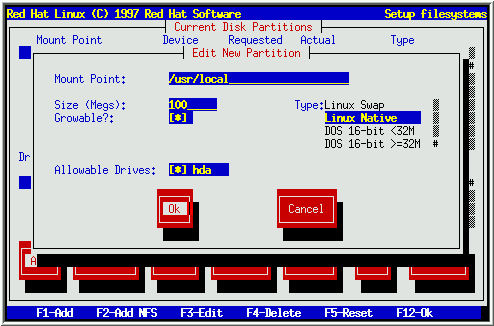
To Add a new partition, select the Add button, and press [Space] or [Enter]. A dialog box entitled ``Edit New Partition'' will appear (see Figure 18). It contains the following fields:
If your attempt to add a partition and Disk Druid can't carry out your request, you'll see a dialog box like the one in figure 19. In the box are listed any partitions that are currently unallocated, along with the reason they could not be allocated. Select the Ok button, and press [Space] to continue. Note that the unallocated partition(s) are also displayed on Disk Druid's main screen (though you may have to scroll the ``Current Disk Partitions'' section to see them).
To delete a partition, highlight the partition in the ``Current Disk Partitions'' section, select the Delete button, and press [Space]. You will be asked to confirm the deletion.
To change a partition's settings, highlight the partition in the ``Current Disk Partitions'' section, select the Edit button, and press [Space]. You will be presented with a dialog box very similar to the one shown in Figure 18. Make the appropriate changes, select Ok, and press [Space].
Please Note: If the partition already existed on your hard disk, you will only be able to change the partition's mount point. If you want to make any other changes, you will need to delete the partition and recreate it.
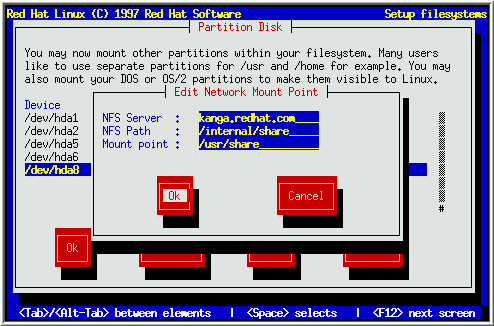
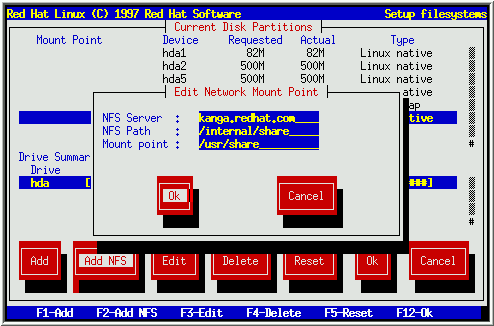
To add a read-only NFS-served filesystem, select the Add NFS button, and press [Space]. If you have not selected a network-related installation method, you will be presented with several dialog boxes concerning network configuration (Turn back to Section 3.4.5 for more information). Fill them in appropriately. You will then see a dialog box entitled, ``Edit Network Mount Point'' (see Figure 20. In this dialog box you will need to enter the NFS server name, the path to the exported filesystem, and the mount point for the filesystem. Select the Ok or Cancel button as appropriate, and press [Space].
If you'd like to abandon any changes you've made while in Disk Druid, you can select the Reset button, and press [Space]. You will be asked to confirm this action. If you select Yes, Disk Druid will reread the partition tables (if any exist) from each hard disk, and display them. Selecting No allows you to return to Disk Druid's main screen, where you can continue your work.
If you would rather use fdisk, select Cancel, and press [Space]. You can then select fdisk from the ``Disk Setup'' dialog box.
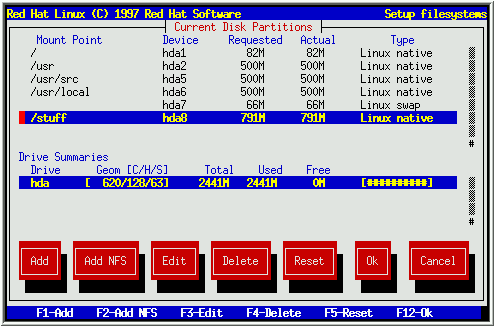
Once you've finished configuring partitions and entering mount points, your screen should look something like the one in Figure 21. Select OK, and press [Space]. Then turn to Section 4.4.
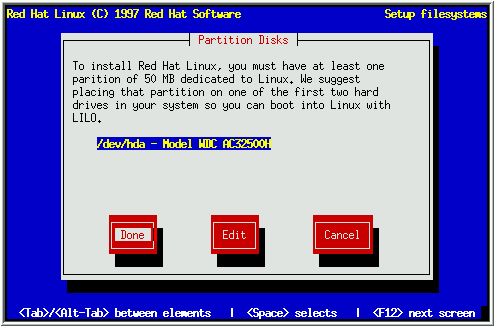
If you'd rather use fdisk to manage partitions, this is the section for you. Once you've selected fdisk, you'll be presented with a dialog box entitled ``Partition Disk'' (see Figure 22). In this box is a list of every disk on your computer. Move the highlight to the disk you'd like to partition, select Edit, and press [Space]. You will then enter fdisk and can partition the disk you selected. Repeat this process for each disk you want to partition. When you're done, select ``Done''.
fdisk includes online help which is terse but useful. Here are a few tips:
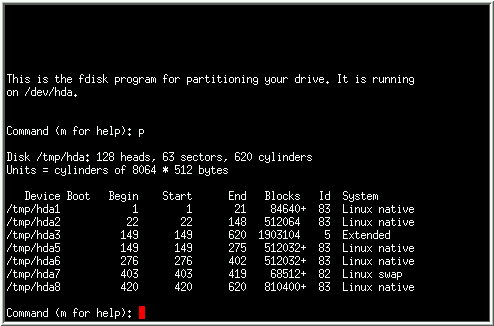
Linux refers to disk partitions using a combination of letters and numbers which may be confusing to inexperienced users. Here is a summary:
When you are finished partitioning your disks, press Done; you may see a message indicating that the installation program needs to reboot. This is a normal occurrence after changing a disk's partition data; it usually happens if you created, changed, or deleted any extended partitions. After you press OK, your machine will reboot. Follow the same installation steps you did up until Partitioning Disks; then simply choose Done.
Since Red Hat Linux may be distributed across several disk partitions, you need to choose which disk partitions go with which filesystem.
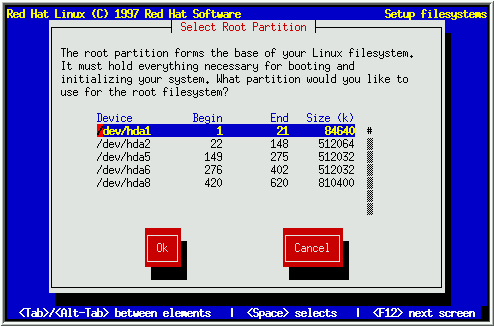
If you are performing a full install, the installation program presents a list of the Linux partitions it can find and prompts you to choose a root partition (see Figure 24. The root partition (or root filesystem) is the one which holds everything necessary to boot your Red Hat Linux system; it is mounted on / (the root directory) when your system boots. Select the root partition you wish to use and press [Enter].
If you are performing an upgrade, the installation program tries to find your root partition automatically; if it finds one, it goes on to the next step.
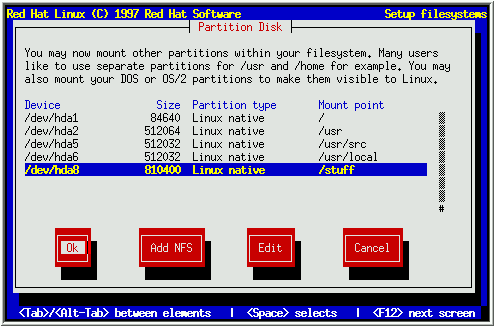
The next dialog box contains a list of all disk partitions with filesystems readable by Red Hat Linux, including partitions for MS-DOS or Windows. This gives you the opportunity to assign these partitions to different parts of your Red Hat Linux filesystem. The partitions you assign will be automatically mounted when your Red Hat Linux system boots. Select the partition you wish to assign and press [Enter] (or choose Edit); then enter the mount point for that partition, e.g., /usr (see Figure 25).
Additionally, Red Hat Linux allows you to mount read-only NFS volumes when your system boots; this allows directory trees to be shared across a network. Choose Add NFS. If you have not selected a network-related installation method, you will be presented with several dialog boxes concerning network configuration (Turn back to Section 3.4.6 for more information). Fill them in appropriately. You will then see a dialog box entitled ``Edit Network Mount Point''. Enter the NFS server's hostname, the path to the NFS volume, and the local mount point for that volume (see Figure 26).