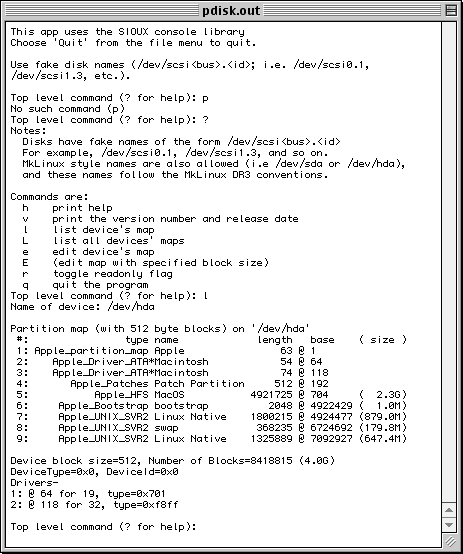
If you should have to do a destructive re-partition, you can safely re-install MacOS before the Mandrake Linux install, to insure that the Drakx installer will detect and setup your MacOS partition(s) for booting. Below is a screen shot of pdisk on an iMac, setup with a 2.3GB partition for MacOS (hda5), a 1MB bootstrap partition on hda6, and hda7, 8, and 9 used for Linux "/", swap and "/home".
If you are unfamiliar with names such as hda5, this is how Linux names the disk partitions. "hda" means the first IDE hard-drive, where the 2nd would be named "hdb". Likewise SCSI drives are name sda, sdb and so forth. Finally, the trailing number is the actual partition number on the disk.
If you press "TAB", you'll see a number of options that can be used with the installer, optimized for the various video configurations used in Apple machines. Just pressing enter will use the most basic "novideo", framebuffer Apple display mode, which should be appropriate for many machines. If none of the graphical install methods work for your machine, there is also a text-based installer available. The "rescue" option can be used to access your Mandrake Linux PPC system, in the event that you are unable to boot into the system at some later date. This rescue image contains some core applications that may allow you to recover your system.
| install-novideo | Basic, framebuffer video support (graphical install). |
| install-atyfb | Support for ATI,Mach64 based cards (graphical install). |
| install-aty128fb | Support for ATI,Mach128 based cards (graphicalinstall). |
| install-text | Text based install |
| install-net | NetBoot install (graphical install) |
| install-net-text | NetBoot install. |
| rescue | Text based rescue mode. |
| rescue-net | NetBoot Text based rescue mode. |
tftp dgram udp wait root /usr/sbin/tcpd in.tftpd/etc/hosts.allow should be opened up for tftp on your local network:
in.tftpd: 192.168.192.If you have to change these, be sure to stop/start inetd:
/etc/rc.d/init.d/inet restartThe default directory is /tftpboot. Put all the files in the Linux Mandrake PPC boot directory (except README) here:
bash-2.03$ ls -l /tftpboot/

-rw-r--r--   1 root     root      1243868 May 22 17:16 all.gz
-rw-r--r--   1 root     root      2455573 May 22 17:16 vmlinux
-rw-r--r--   1 root     root        58556 May 22 17:16 yaboot
-rw-r--r--   1 root     root         1396 May 22 17:20 yaboot.conf
dhcpd daemon:
[stew@powerbook linux]$ dmesg | grep eth0
eth0: BMAC+ at 00:50:e4:b9:07:70
The series of hex numbers seperated by colons is the MAC address of the ethernet adapater. Now you need to setup /etc/dhcpd.conf:
default-lease-time            21600;
max-lease-time                21600;

option subnet-mask            255.255.255.0;
option broadcast-address      192.168.192.255;
option routers                192.168.192.1;
option domain-name-servers    192.168.192.1;
option domain-name            "ays.net";

shared-network WORKSTATIONS {
    subnet 192.168.192.0 netmask 255.255.255.0 {
    }
}

group   {
    use-host-decl-names       on;

    host imac {
        hardware ethernet     00:05:02:6B:45:29;
        fixed-address         192.168.192.5;
        filename              "/tftpboot/yaboot";
    }
}
Then start or restart dhcpd:
/etc/rc.d/init.d/dhcpd startIf the server starts up normally, you should see something like this in /var/log.messages:
May 22 17:19:06 moe dhcpd: Copyright 1995, 1996, 1997, 1998 The Internet Software Consortium.
May 22 17:19:06 moe dhcpd: All rights reserved.
May 22 17:19:06 moe dhcpd: Listening on Socket/eth0/WORKSTATIONS
May 22 17:19:06 moe dhcpd: Sending on   Socket/eth0/WORKSTATIONS
May 22 17:19:06 moe dhcpd: dhcpd startup succeeded
That should be it. Instead of holding down the "C" key on the Apple machine, use the "N" key and you should see the Mandrake Linux PPC boot prompt.
Because many Macintosh machines have only a one button mouse, and XFree, the Linux GUI, really needs three buttons to be fully productive, the Drakx installer will prompt you for which keys you would like to use to emulate the second and third mouse buttons. If you have a three button mouse, the actual buttons will still be used, and you can set the emulation to "None | None", or use the emulation too.
The Drakx installer will attempt to allocate a 1MB partition as an "Apple Bootstrap" partition. This partition should not be visible from MacOS, but is configured as a "blessed" boot partitiion that the Apple Open Firmware will see as the boot device, allowing you to boot either Linux or MacOS. Some users find this a good place to keep an emergency backup Linux kernel too.
Once you've setup your partitions, the Drakx installer allows you pick from the over 1000 software packages available with Mandrake Linux PPC. Drakx will automatically any additional packages that your selections may be dependant on.
Once the install finishes you will be prompted to setup a password for the "root" user. In Linux, the "root" user has full control over the system, and can also do the most damage. For normal, day-to-day use, you will want to setup a second "user" account, as well additional accounts for any friends or family members that may be going to use your system. If the machine is going to be utilized as a server, setup accounts for whomever may need direct access to the machine. Users can also be added anytime after the install.
Once you've setup your users, the Drakx installer will assist you in setting up your network and/or internet connection, and then present you with a final list of detected/configured hardware. Should you wish to make any changes, you may do so at this time.
The next step is the bootloader setup. The Drakx installer should detect and setup at least one MacOS partition if it is available on your machine. If for some reason it doesn't, or you wish to add additional OS versions, use the "Add" button and specify the operating system and partition number.
As you may have noted from the pdisk screen shot above, the Apple partition table has a number of small partitions, generally at the beginning of the disk that are used by MacOS for drivers. These should be left alone. Another item to note is that the partition table itself uses the first partition, so your operating system will always reside on partition table 2 or higher.
After the bootloader information is written to the bootstrap partition, you'll
see a prompt describing a possible Open Firmware routine you'll need to use in
the event that Open Firmware fails to recognize the "bootstrap" partition.
Jot this command down, and should Linux or MacOS fail to boot, boot into
Open Firmware by pressing the "Command-Option-O-F" keys after the
boot chime, and type:
setenv boot-device hd:X,\\:tbxiWhere "X" will be the partition number of the bootstrap partition. (If you aren't familar with these special Apple keys, Command = the "apple" or "cloverleaf" graphic key on the lower row of keys. The Option key may alternately be labelled "Alt"). If something should go wrong and you are unable to boot either operating system, you can press "Command-Option-P-R" after the boot chime. You should hear an additional chime and this should reset the system PRAM to the factory defaults.
Finally, you'll setup XFree, the Linux graphical user interface (GUI). The Drakx installer should detect and configure XFree for your video hardware, as well as give you some options to fine-tune the setup. Generally you'll want to select as high of screen resolution (width x height) that your hardware supports, and either 15 or 24bpp color. You also have the option to use Xpmac, which is a simple framebuffer driver that is used by the Mandrake Linux PPC installer. Although the installer offers the option of testing the configuration, it is best at this time to just make the settings and not try to test them.